
Quizzes
What is the Quizzes Tool?
The Quizzes tool enables you to create and manage points-measured assessments. As part of your quantifiable assessment procedures, you can use quizzes to help evaluate users’ learning progress and learning outcomes. Quizzes also provide users with feedback on their learning progress. Users can take a quiz, review their quiz results, and see class statistics for a quiz.
Create and manage quiz questions from the Question Library or the Quizzes tool, and organize quizzes into categories to make it easier to find assessments with similar or related content. Use the quiz preview option to test the accuracy of content and grading before you release a quiz. In a preview, you can answer the questions, view allowed hints, submit the quiz, auto-grade answers, read feedback, and view report results.
You can also view quiz statistics such as grade distribution, grade average, question statistics, and user statistics on the Statistics page for completed quizzes.
Accessing the Quizzes Tool
The Quizzes tool is not one of the links found on the default navigation bar of your in-class CourseLink course site. The Quizzes tool will need to be Added to your Navbar.
For Distance Education (DE) courses, the Quizzes link appears under the drop-down menu of the Tools link on the navigation bar (provided that the course is using Quizzes).
Set up Timing & Display
You can create a time limit for your quiz and set up how the quiz displays to learners.
To set a time limit
To set a time limit and enter the length of time for the quiz:
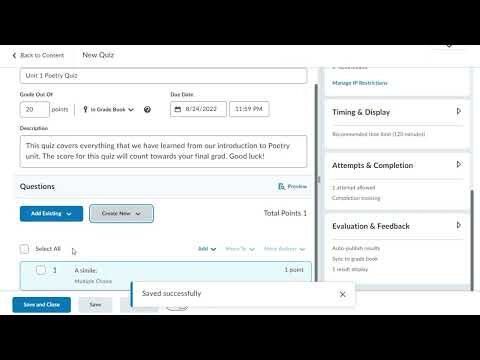
From the New Quiz page, click to expand the Timing & Display drop-down menu.
Select Set time limit.
In the Time Limit field, specify the length of time for the quiz in minutes.
Click Timer Settings and do one of the following.
If you want to automatically submit the quiz when the time limit is exceeded, select Automatically submit quiz attempt. *Please note that submitted attempts cannot be reopened.
If you want learners to be able to continue working after the time limit, select Flag as time limit exceeded and allow the learner to continue working.
If you do not want to enforce the time limit, select Do nothing: the time limit is not enforced.
If you have completed customizing your quiz, click Save and Close.
Setting up a synchronous quiz in the New Quiz Experience
On the navbar, click Quizzes.
On the Manage Quizzes tab, click New Quiz or one of the quizzes you would like to edit.
On the Quiz Creation screen, click to expand Timing & Display.
Check Set time limit, then enter a Time Limit in minutes.
Click Edit Timer Settings.
In the Timing dialog, under Quiz Start, select Synchronous: Timer starts on the start date.
Note: If there is no Start time and date set for the synchronous quiz, a No start date set alert appears under the radio button option and you are not able to save the quiz. Due date is disabled for synchronous quizzes. End date is not necessary but can be added.

7. Under When The Time Limit Expires, select one of the following:
Automatically submit the quiz attempt
Flag as "exceeded time limit" and allow the learner to continue working
Do nothing: the time limit is not enforced
8. Click OK.
Single Login Session
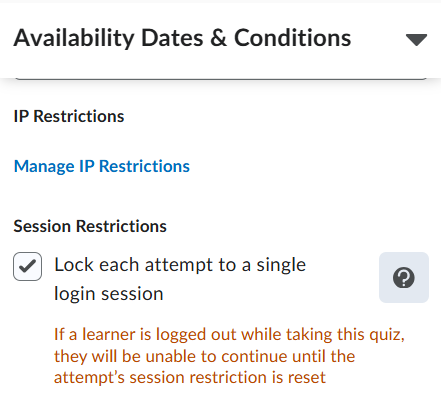
Lock each attempt to a single login session to restrict attempts to one active session. When this setting is enabled, students cannot resume the quiz using another browser session.
On the navbar, click Quizzes.
On the Manage Quizzes tab, click New Quiz or one of the quizzes you would like to edit.
On the Quiz Creation screen, click to expand Avalibility Dates & Conditions.
Select Session Restrictions.
Using the Quizzes Tool
For the most up-to-date information on how to use the Quizzes tool, please follow the links below to the Brightspace Help documentation site.
EQUATION QUESTIONS (GRAPHICAL / CHEMISTRY / MATHML / LATEX)
Bulk Randomize Answers in Quiz MCQs
CourseLink includes a built-in option to randomize answer choices for individual Multiple Choice and Multi-Select questions. If you only need to randomize a few questions, you can use CourseLink's question settings to do so.
However, if you would like to randomize answer options for multiple questions at once, follow the steps below to apply this setting in bulk before importing your questions into the Question Library.
Go to, "Admin Tools"
Choose, "Important / Export/ Copy Components"
Choose, "Export Brightspace package"
Choose, “Question Library"
Click the radio button, “Select Individual Items to export"
Choose the relevant (instructor pre-defined) subdirectory (collection of questions).
Leave the "Include course files in the export package” box empty (unless you plan to import them to another course)
Click, “Export"
A message will appear saying, “Export Started” “Your export has been started. You will receive a notification in the Update Alerts when it has been completed."
Click on the notifications bell at the top right of your CourseLink page.
When ready, it will say, "Exported course - ABCD*1234…" Click on it.
It will say, "Export Summary, the course export was successful. Click here to download the export Zip package" Click on it.
Download the .zip file to your course subdirectory on your desktop/laptop.
Double click it to Uncompress it.
Use an existing text editor or download something like the “Sublime” text app from https://www.sublimetext.com/download
From the uncompressed folder, Open the file “Questiondb.xml”.
Find all instances of, render_choice shuffle="no" and Replace them with, render_choice shuffle="yes"
Save the questiondb.xml file and close it.
Compress the D2LExport folder back into a .zip file
On Windows, right-click on the folder and choose Send to and Compressed (zipped) folder
On a Mac, right-click on the folder and choose Compress
Return to your Question Library and click on the relevant (predefined) subdirectory where you want the questions to appear.
From the pull down menu, click “Import”.
Choose, "Upload a File”.
Upload the new .zip file (you just created/compressed).
After checking the new questions to ensure that answer order shuffle has been enabled, delete the original questions from the Question Library.
Inserting Images into Questions
1. Select your Question type (E.g. Multiple Choice)

3. Select the method in which you would like to upload your
image into the question (E.g. desktop file, url link, etc.)

2. Select the Add Image icon within the text box.

On this Page
Tutorial Videos

Related Resources and Programming:
Related Tools
Need More Help?
If you're still having trouble, please contact the CourseLink Support team for assistance.