What is the CourseLink Toolbox?
The CourseLink Toolbox application is a custom-built suite of CourseLink productivity tools. It began as an ad-hoc project to build and share additional custom utilities specifically for assisting CourseLink Support with common requests.
This application has now matured and is ready for release to our instructor community, allowing you to leverage the same tools safely and securely for your own course site(s).
User Tools
Bulk Enroll
The bulk enroll tool allows instructors and administrators to add guests to their courses in bulk. Choose the course and copy a CSV formatted list of usernames, email addresses, or student ID numbers into the User Data box and the tool will do the rest.
Note: This tool should only be used to enroll guests. Registered students are automatically added to and removed from CourseLink daily after courses are mapped using the Course Creation Tool.
-
Course: Select the specific course for enrollment. If you don’t see the course listed, you are either not enrolled in CourseLink or you can try clicking the Show Previous Offerings toggle.
Section: You have the option to enroll the guests in a particular section of the course. Selecting a section is optional.
Role: Although all roles are available in the dropdown list, the ability to add a guest with a specific role depends on your role in the selected CourseLink course. You will receive an error message if your course-level role is not able to enroll a guest with the role you have selected.
Auto Create Users: This option will automatically create CourseLink accounts for users who haven’t used CourseLink yet. Almost all staff, student, and instructor accounts are created through other processes, but some might not be included in those processes.
User Type: Only administrators are able to create external users. Instructors can add internal users who have an existing UofG / GH central account.
User Delimiter: Specifies how the list of guests in the User Data box is formatted.
-
After submitting the form, the Bulk Enrollment processing screen displays the initial results of the request, including any existing errors. You can go back to correct errors at this point, otherwise click the Create and/or Enroll Users button to proceed. Any enrollment errors will be displayed as the requests are confirmed.

Figure: The Bulk Enroll tool confirmation screen showing a failed enrollment.
Group Tools
Group by Section
The Group by Section tool allows users to configure the creation of a new group category and groups that are restricted to students enrolled in the same section.
-
Course: Select the specific course. If you don’t see the course listed, you are either not enrolled in CourseLink or you can try clicking the Show Previous Offerings toggle.
Limit to Sections: Select the sections you would like to use to create your groups. A set of groups will be created for each section.
Create Category Name: Provide the Groups category name that you would like to see listed in CourseLink.
Users Per Group: Set the maximum number of users for each group. A new group will be created when the maximum is reached.
Identify Sections By: Determines the name of the groups. The group title will include the section code, course code, or both.
Enumerate Groups: Toggle on if you would like group numbers included in the group title.
Only Include: Select the roles you would like to include in the group formation.
Group Prefix: Include a word or phrase before the title for each group.
-
After submitting the form, the Group by Section processing screen displays the results of the request. The number of required groups for each section will be displayed, as well as the group titles. Below, all students affected will be shown with their group enrollment listed. Click Process Groups to confirm and to create the groups in CourseLink.

Figure: The Group by Section confirmation screen results.
Group List
The Group List tool retrieves a full list of groups and its members for a specified group category. All groups will be displayed in a single table. Results can be printed, copied, or exported to a CSV or Excel file.
-
Course: Select the specific course. If you don’t see the course listed, you are either not enrolled in CourseLink or you can try clicking the Show Previous Offerings toggle.
Group Category: Select the specific group category from the groups available in CourseLink.
-
The results of the request will be displayed showing the course, group category, and group count. The options to print, copy, or export to CSV or Excel will be available at the top of the results table.
An additional option to export a CSV file that can use the listed CourseLink groups to created pre-assigned Zoom breakout rooms can also be found as a button above the results table.

Group Rename
The Group Rename tool allows users to rename already configured groups that were created in CourseLink. The tool quickly renames groups with a prefix or sequential numbering.
-
Course: Select the specific course. If you don’t see the course listed, you are either not enrolled in CourseLink or you can try clicking the Show Previous Offerings toggle.
Group Category: Select the specific group category from groups available in CourseLink.
Add Prefix: Add a specific word or phrase to show up before the group titles.
Rename: Change the existing title of each group to a specific word or phrase.
Add Suffix: Add a specific word or phrase to show up after the group titles.
Renumber Sequentially: Add numbers after the group titles.
Use Leading Zeros: Start numbering with a zero (0), or multiple zeros (00). -
The results of the request will be displayed showing the original names and the modified names. Click the Rename Groups button to proceed.
Create Predefined
The Create Predefined tool creates groups from a predefined list in a new or preexisting group category. It also provides the option to enroll users into those groups.
-
Course: Select the specific course. If you don’t see the course listed, you are either not enrolled in CourseLink or you can try clicking the Show Previous Offerings toggle.
Group Category: Select the specific group category from groups available in CourseLink or select Create new Category.
Group Data: Copy and paste the group names OR the group name and user identifier (username, student ID, email). Each group name or group name/user combo should be separated by a new line.
Delimiter: Choose the row delimiter for group name/user combo (comma or tab). If you are adding group names only, no delimiter is necessary.
-
The results of the request will be displayed showing the new group category (if selected) and the new group names. Individual users will be shown with their groups if you provided users. Click the Create Groups & Enroll Users button to proceed.
Enroll into Existing
The Enroll into Existing tool evenly distributes users of a specified role into existing groups of a selected course and group category. This process takes existing enrollments into consideration, without modifying them.
-
Course: Select the specific course. If you don’t see the course listed, you are either not enrolled in CourseLink or you can try clicking the Show Previous Offerings toggle.
Group Category: Select the specific group category from groups available in CourseLink.
Only Include: Select the roles to be included in the enrollment.
Exclude Users: Add the username of any users who should be excluded from the enrollment process.
User Distribution Order: Select the type of user distribution you would like to use as part of the enrollment process (Random, Last Name, First Name).
Fill Group Order: Select the type of group distribution you would like to use as part of the enrollment process (Random, By Group Name, By Creation Date).
Fill Partial Groups: Select the type of partial group filling you would like to use as part of the enrollment process (First, Last).
-
The results of the request will be displayed showing the table of existing groups and user enrollments. Any users originally enrolled in the groups will be shown with a check mark. Click the Enroll Users button to proceed with any new enrollments.

Figure: The Enroll into Existing tool confirmation showing one student already enrolled.
Miscellaneous
Gradebook Column Copy
The Gradebook Column Copy tool copies the grade values from one CourseLink Grades column into another. Values can be copied between different grade item types (e.g., from a formula type to a numeric type) or between grade items of the same type.
Note: The destination grade item must be created in CourseLink prior to using this tool. The tool cannot create grade items.
-
Course: Select the specific course. If you don’t see the course listed, you are either not enrolled in CourseLink or you can try clicking the Show Previous Offerings toggle.
Only Include: Select the roles to be included in the grade copy.
Source Column: Select the source column to be used for the grade copy.
Destination Column: Select the destination column to be used for the grade copy. Any existing values in the column will be overwritten.
-
The results of the request will be displayed showing a table of users and the current source and destination values. A warning will be displayed if the max points of each column does not match. Click the Copy Values button to proceed.
Training Course Report
The Training Course Report tool provides departmental administrators with access to their department’s completion tracking of the Environmental Health and Safety (EHS) CourseLink training courses. All departmental employees enrolled in the courses will be provided.
Please contact CourseLink to set up access if you are the administrator for your department.
-
Training Course: Select All or specific training courses from the list of available courses.
Department: Select All or a specific department from the list of available departments.
Staff: Select All or specific staff members from the list of available employees.
-
The results of the training courses will be displayed in table format. Use the buttons at the top of the table to Copy, export to CSV or Excel, or Print the results.
Yes – completed
No – not completed
N/A – not enrolled
CourseLink Quiz Printing
The CourseLink Quiz Printing tool allows an instructor to download a print ready and editable Word document of their CourseLink quiz and optionally generate an answer key.
The quiz printing tool does have some limitations that instructors should be aware of and consider when trying to print a quiz or when creating new quizzes.
The following question types are not supported:
Matching
Ordering
Arithmetic
Significant Figures
The following limitations will affect the download:
Question pools are not available.
Quiz section details such as title, text, and shuffle are not available.
Images attached to questions cannot be retrieved.
Quiz question order is not available. Questions will be grouped by section and displayed in the order that they are retrieved.
Tip: If your quiz uses question pools, it might be possible to make a copy of the quiz and remove the question pools by manually selecting the number of questions you would like on the printed quiz instead. Please contact CourseLink Support for assistance.
-
Course: Select the course site where the quiz resides (only courses with an instructor role will appear).
Quiz: Select the quiz you would like to print.
Generate Answer Key: Enable if you would like an answer key file generated as well.
Include Rich Text: Export the quiz with all HTML and other coding included in the file. Not enabling this option will create a file with plain text only.
Include Unsupported Question Types: For any unsupported questions, the system will add the question number, point value, bonus/mandatory indicators, question text, but will not include the question answer options.
Include Description: Include the quiz description at the top of the quiz file.
Include Header: Include the header information at the top of document.
Include Footer: Include the footer information at the bottom of the document.
Include Section Placeholders: If your quiz has sections, this feature will add a section placeholder in the quiz file that you can fill with information or copy from the original quiz.
Hide Question Hints: Hide the question hints found in ALL questions on the quiz.
Hide Bonus Question Indicators: Allows the instructor to hide the question type description showing that it’s a bonus question.
Hide Mandatory Question Indicators: Allows the instructor to hide the question type description showing that it’s a mandatory question.
-
After clicking Create File, and depending on your browser settings, the file save dialog will be presented where you can adjust the file name of the Word document or Zip file before saving to your device.
A Zip file will contain both the quiz document and quiz answer files (if selected).
PDF Splitter
This tool enables users to split a provided PDF file into multiple smaller PDFs, ensuring that each resulting PDF contains a target specified number of pages.
The PDF Splitter tool can be used by instructors when uploading scanned PDF files into Gradescope or by an SFC when uploading scanned paper questionnaires (SFQs) as a PDF into ABBYY.
-
Source PDF: Choose the PDF from your computer, OneDrive, or network drive.
Target page count per split: Select the maximum page count for each PDF file. The last file will contain any remaining pages.
-
After clicking the Submit button, and depending on your browser settings, the file save dialog will be presented where you can adjust the name of the Zip file before saving to your device.
Grade and Feedback Import Tool
This tool allows you to upload grades and feedback in bulk to your CourseLink gradebook. By importing a properly formatted CSV file containing three columns—student identifier, grade, and feedback—you can efficiently update a single grade item while reducing manual entry.
-
Course: Select your course by entering the Course OUID (OUIDs are the last 6 digits of a course site’s homepage URL).
Grade Item: Select the CourseLink grade item that you want to import grades into.
Grade File: Choose a csv file with acceptable data formatting. (View a sample file)
-
If the file has data in the correct format, a success message will be shown, and the entries will be displayed in the results table.
If there is a formatting error within the file being imported, an error message will be displayed.
Please see the attached pictures for reference.
-
After the file is successfully imported, click “Confirm and Import” button to export these results to the gradebook in CourseLink.
If the row is successfully uploaded, you will see green check marks in the rows indicating the success.
If there are data discrepancies, you will see red exclamation marks indicating that the export to gradebook failed. For example, if a student is no longer in the Classlist and you are trying to upload their grades, it will not export the grades to CourseLink and will show the red exclamatory mark for those students.
-
The feedback can be formatted using HTML tags as the results table in this tool renders HTML correctly and the formatting is preserved in CourseLink as well.
The feedback exported to CourseLink is visible in the gradebook.
The feedback is also visible in the corresponding activities connected to a grade item (if any) except for Group Dropbox submissions where the feedback is not visible to the instructors in the activity area.
The feedback can be updated as well using the Grade and Feedback Import Tool.
The feedback can also be updated through the corresponding activities connected to a grade item (if any) and will sync with the gradebook except for Group Dropbox submissions where this sync doesn’t work.
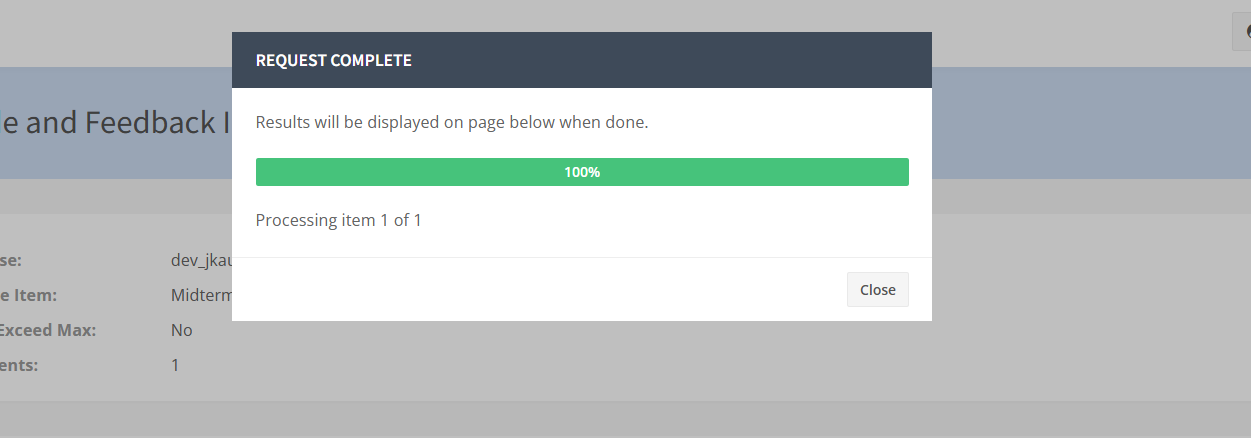
Image showing success message received when data is imported in the results table.
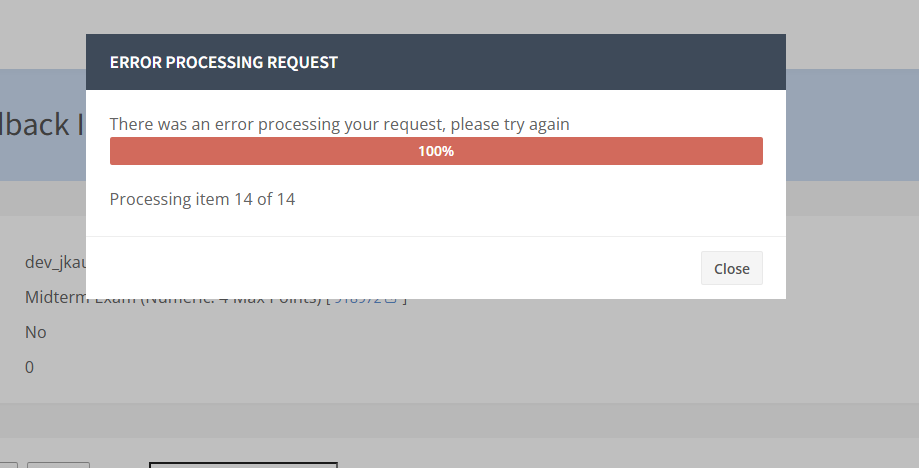
Image showing error message received when the grade file has formatting errors.
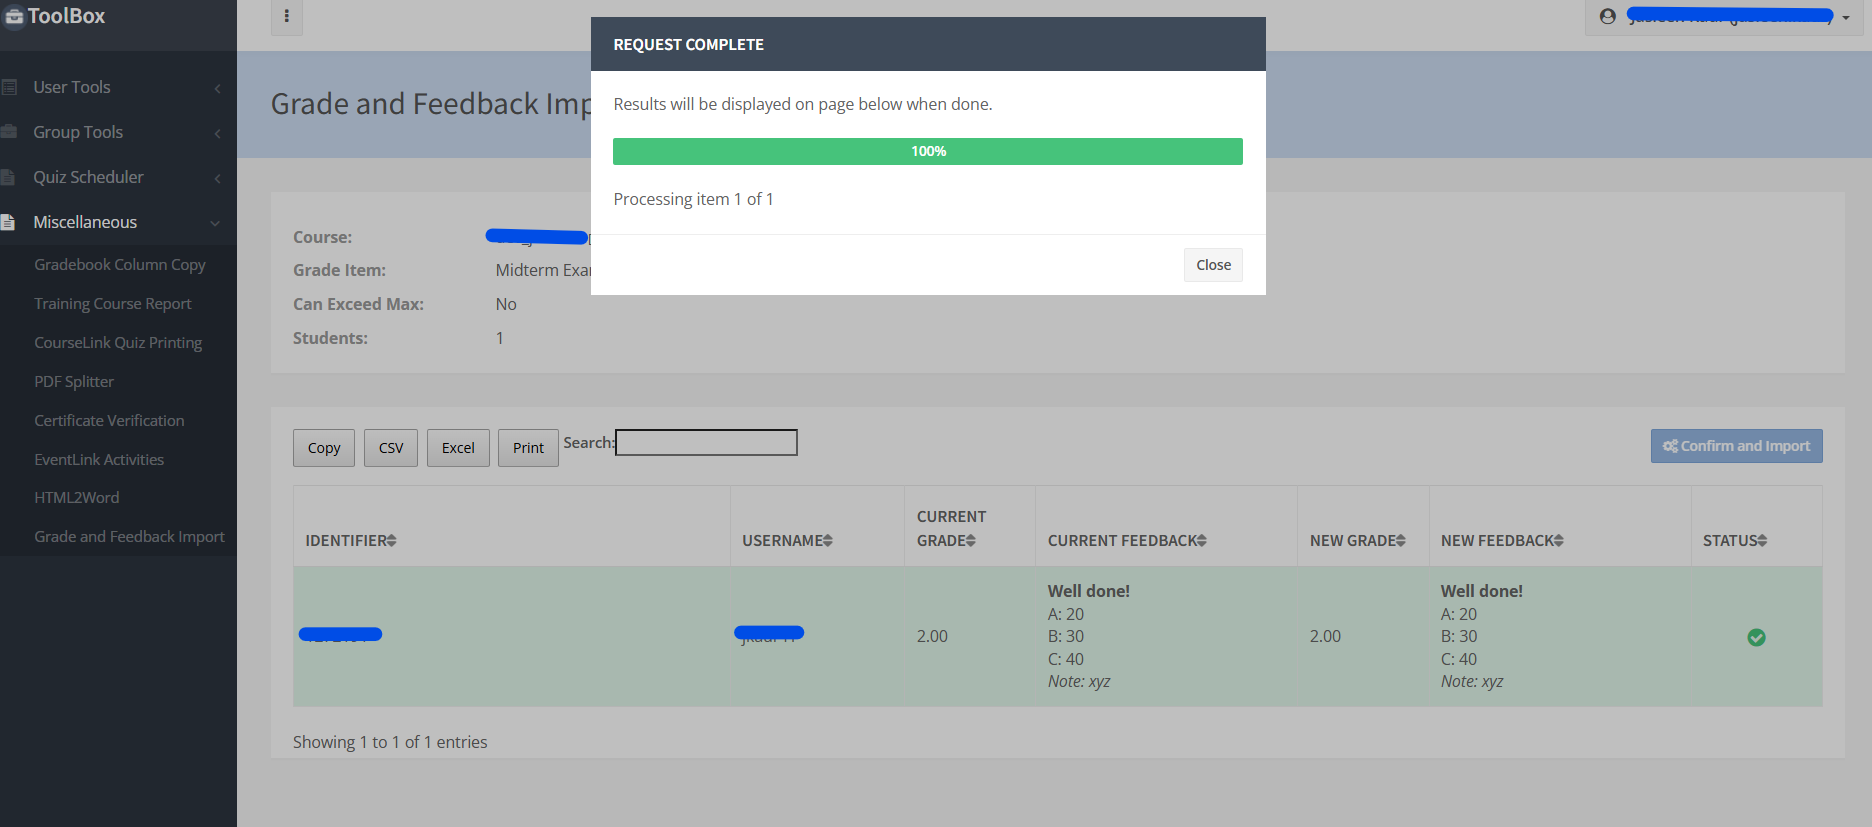
Image showing the status in the results page if the data is successfully exported to gradebook.
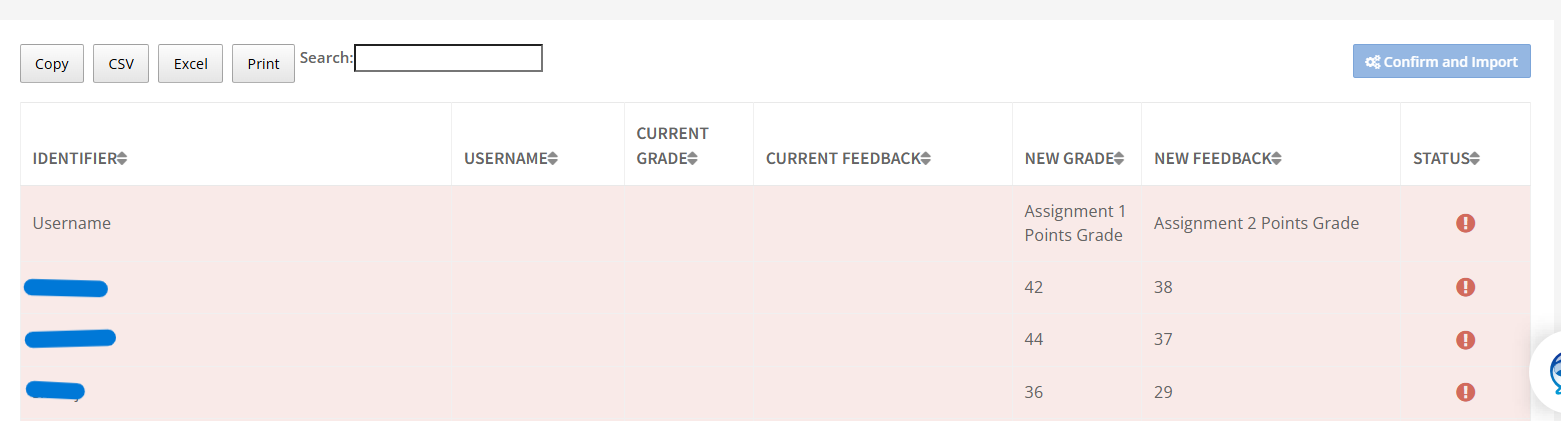
Image showing the status in the results table when the data isn’t imported successfully to gradebook.
Need More Help?
If you're still having trouble, please contact the CourseLink Support team for assistance.